
Good parts start with good mold design. The mold is the heart of the injection molding process. A well-designed mold produces consistent, high-quality parts for millions of cycles. A poorly designed mold leads to defects, delays, and extra costs. This guide covers the key principles of injection mold design. You will learn about draft angles, wall thickness, gate types, and common mistakes. Whether you are designing a new part or reviewing a mold design, this information will help you avoid problems. Our goal is to make mold design easy to understand for engineers and buyers alike.
Why Mold Design Matters
The mold determines almost everything about your part:
- Quality: A good mold gives you consistent parts with the right dimensions.
- Cost: Mold design affects cycle time, scrap rate, and tool life.
- Speed: A well-designed mold runs smoothly with fewer stoppages.
A small design mistake can cost thousands of dollars to fix later. That’s why getting the design right from the start is so important.
We have seen parts that could not be ejected because there was no draft angle. The mold had to be reworked, delaying production by weeks. Always check the basics before cutting steel.
The Mold Design Process
Here is a simple overview of how a mold is designed:
1. Part Design Review
First, the mold designer looks at your 3D model. They check for features that might cause problems: sharp corners, thick sections, or areas that are hard to fill.
2. Mold Layout
Next, they decide how many cavities the mold will have. One cavity is simple. More cavities make more parts per cycle, but the mold costs more.
3. Gate and Runner Design
The designer picks where the plastic will enter the cavity. This is the gate. They also design the channels (runners) that bring plastic to each gate.
4. Cooling System
Cooling channels are placed around the cavity. Good cooling reduces cycle time and prevents warpage.
5. Ejection System
Ejector pins push the part out of the mold. They must be placed where they won’t mark the part.
6. Final Details
The designer adds vents to let air escape, and any slides or lifters for complex features.
Our in-house mold design and engineering services
Key Design Principles
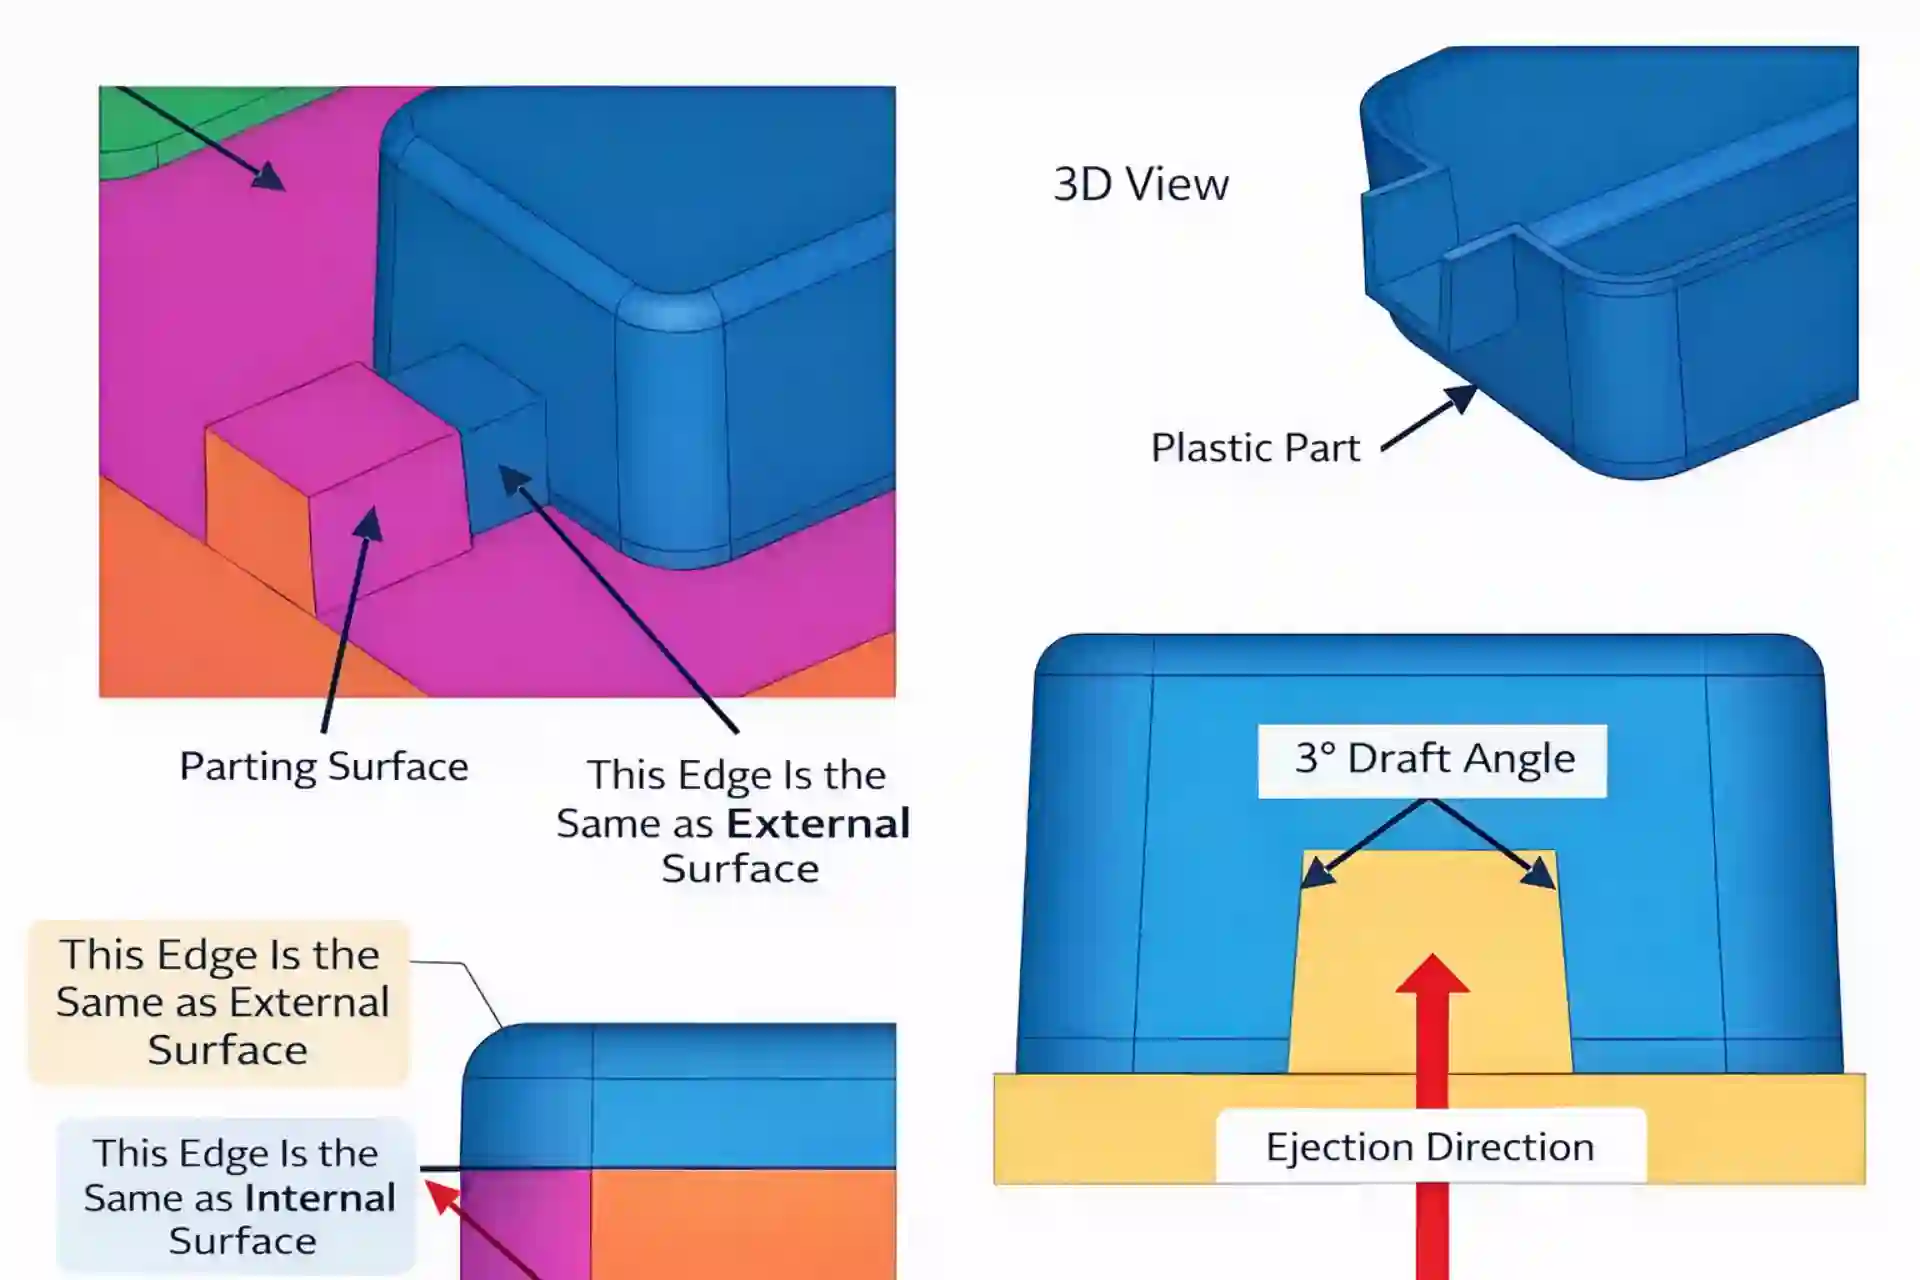
Here are the most important rules for designing parts that are easy to mold.
Draft Angles
Draft is a slight taper on vertical walls. It helps the part release from the mold. Without draft, parts can stick or get scratched.
- How much draft? Usually 1 to 3 degrees per side is enough. For textured surfaces, you may need more.
- Where? All surfaces that are parallel to the mold opening need draft.
【Tip】: If your part has deep ribs or bosses, they also need draft. Otherwise, they may break during ejection.
Uniform Wall Thickness
Plastic shrinks as it cools. If walls have different thicknesses, thick areas shrink more. This causes sink marks and warpage.
- Rule: Keep wall thickness as uniform as possible.
- Transition: If thickness must change, make the change gradual.
Ribs and Bosses
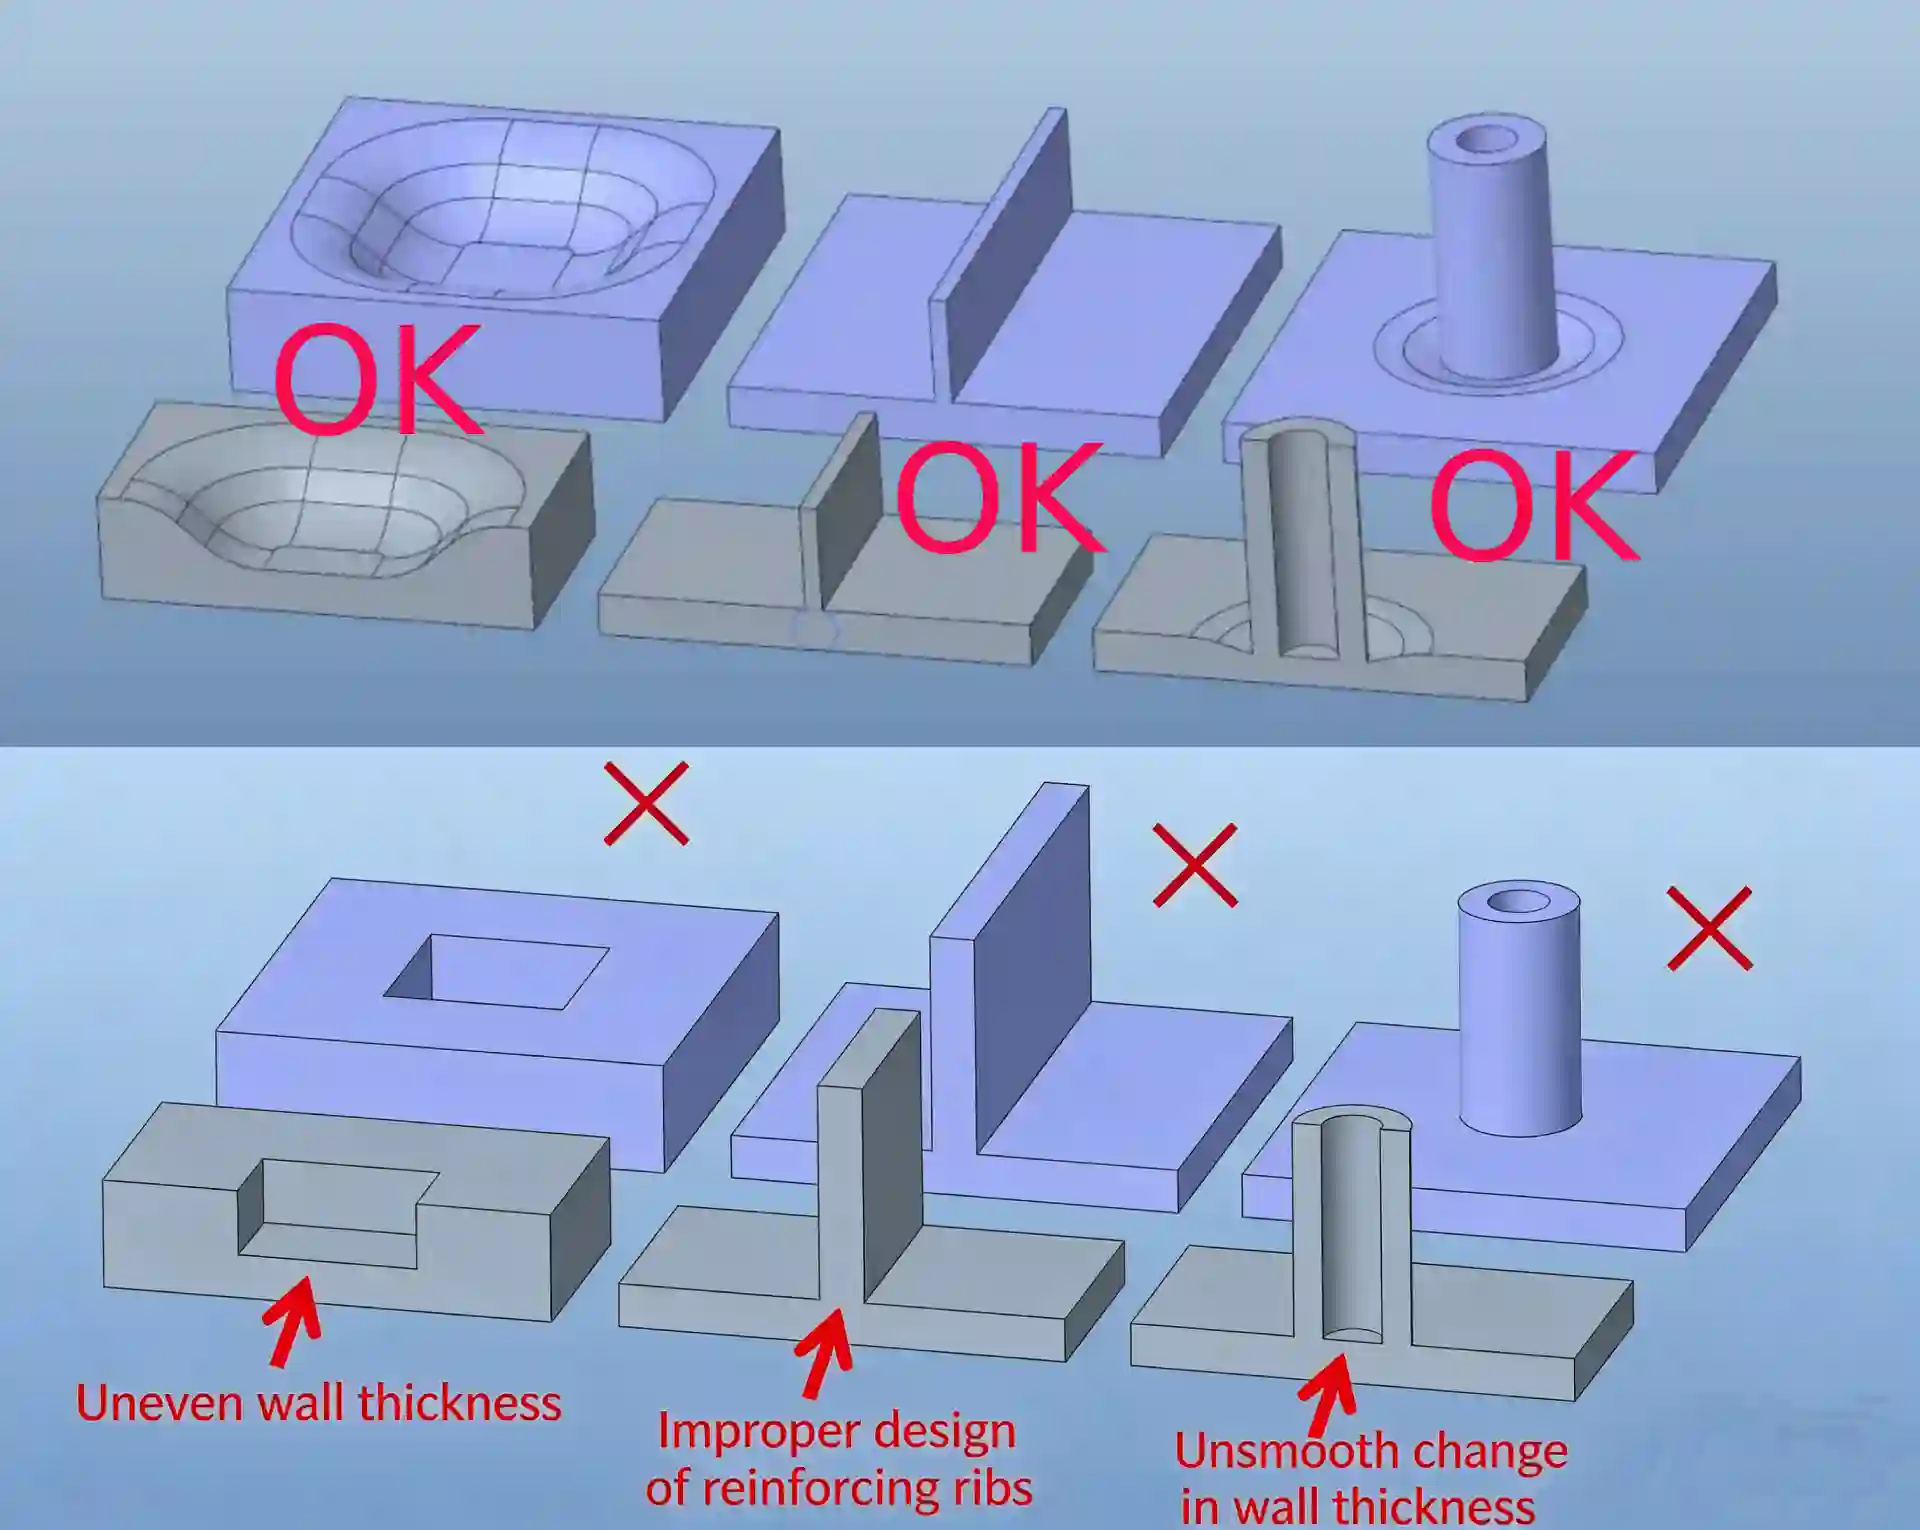
Ribs add strength without making walls thicker. Bosses are used for screw holes.
- Rib thickness: 50% to 60% of the main wall thickness.
- Rib height: No more than 3 times the wall thickness.
- Boss design: Connect bosses to walls with ribs to avoid thick sections.
Corners and Fillets
Sharp corners create stress. They also make it hard for plastic to flow.
- Rule: Use radii on all inside corners. A radius of at least 0.5 times the wall thickness is good.
- Outside corners: Also round them to match the inside radius.
We once saw a part with sharp inside corners that cracked during assembly. Adding a small radius fixed the problem. Always round your corners.
Gates and Gate Location
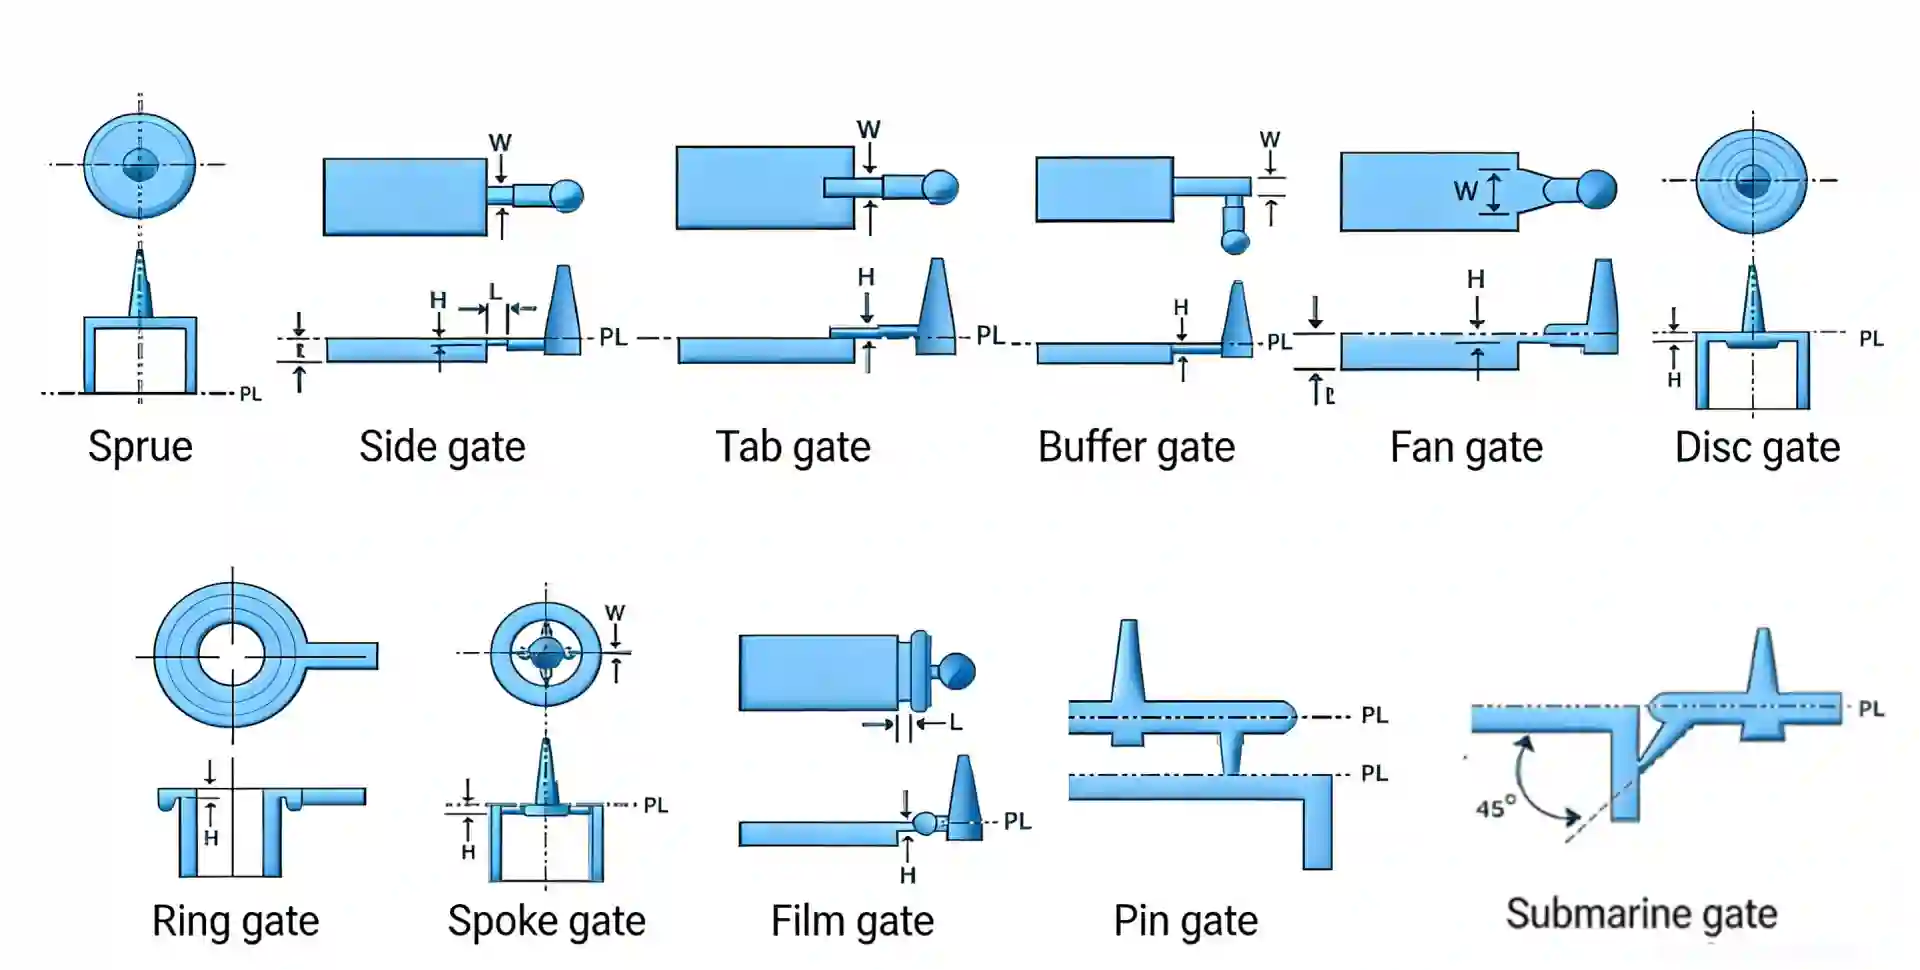
The gate is where plastic enters the cavity. Its location affects:
- Fill pattern: How the plastic flows.
- Weld lines: Where flow fronts meet.
- Aesthetics: Gate marks may be visible.
Common gate types:
| Gate Type | Best For | Notes |
|---|---|---|
| Edge gate | Flat parts | Simple, leaves a small mark on the edge |
| Pin gate | Small parts | Gate mark is small, often on the top |
| Sub gate | Automatic degating | Gate breaks off when part ejects |
| Fan gate | Large, flat parts | Spreads flow evenly |
| Diaphragm gate | Round parts | Even fill for circular parts |
Advanced Mold Features
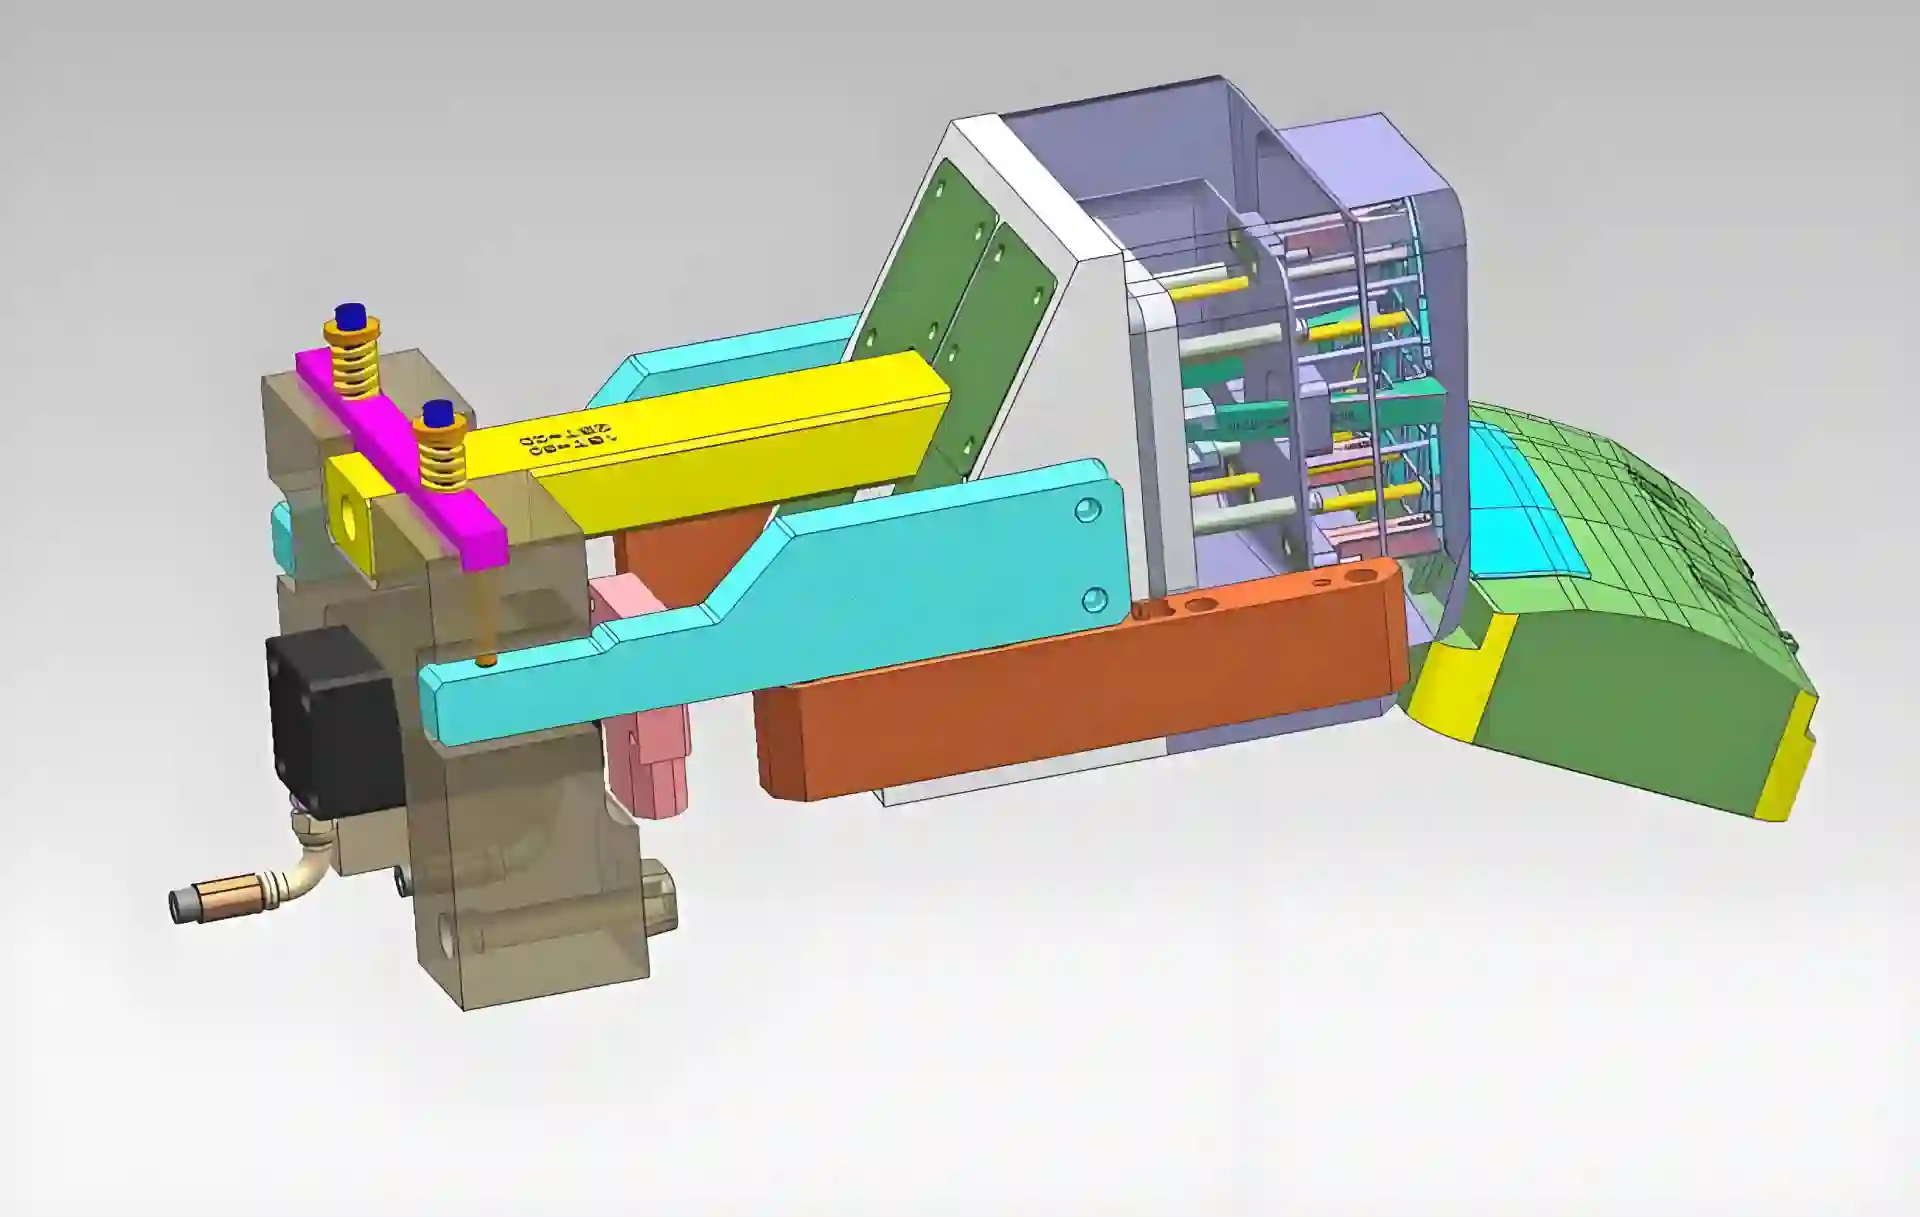
Some parts need more than a simple open-and-close mold.
Slides
Slides move sideways to create undercuts. For example, a hole on the side of a part. The slide pulls out before the part ejects.
Lifters
Lifters are like slides but move at an angle. They are used for internal undercuts.
Hot Runner Systems
In a hot runner, the plastic stays melted inside the mold. There is no runner to throw away. This saves material and cycle time.
Family Molds
A family mold makes different parts in one cycle. This is useful for assemblies. But each cavity must fill at the same time, which can be tricky.
Insert Molds
Insert molding puts metal or other parts into the mold. Plastic is injected around them. This creates a strong bond.
Advanced features add cost to the mold. Only use them if your part really needs them. A simple design is often better.
Cooling System Design
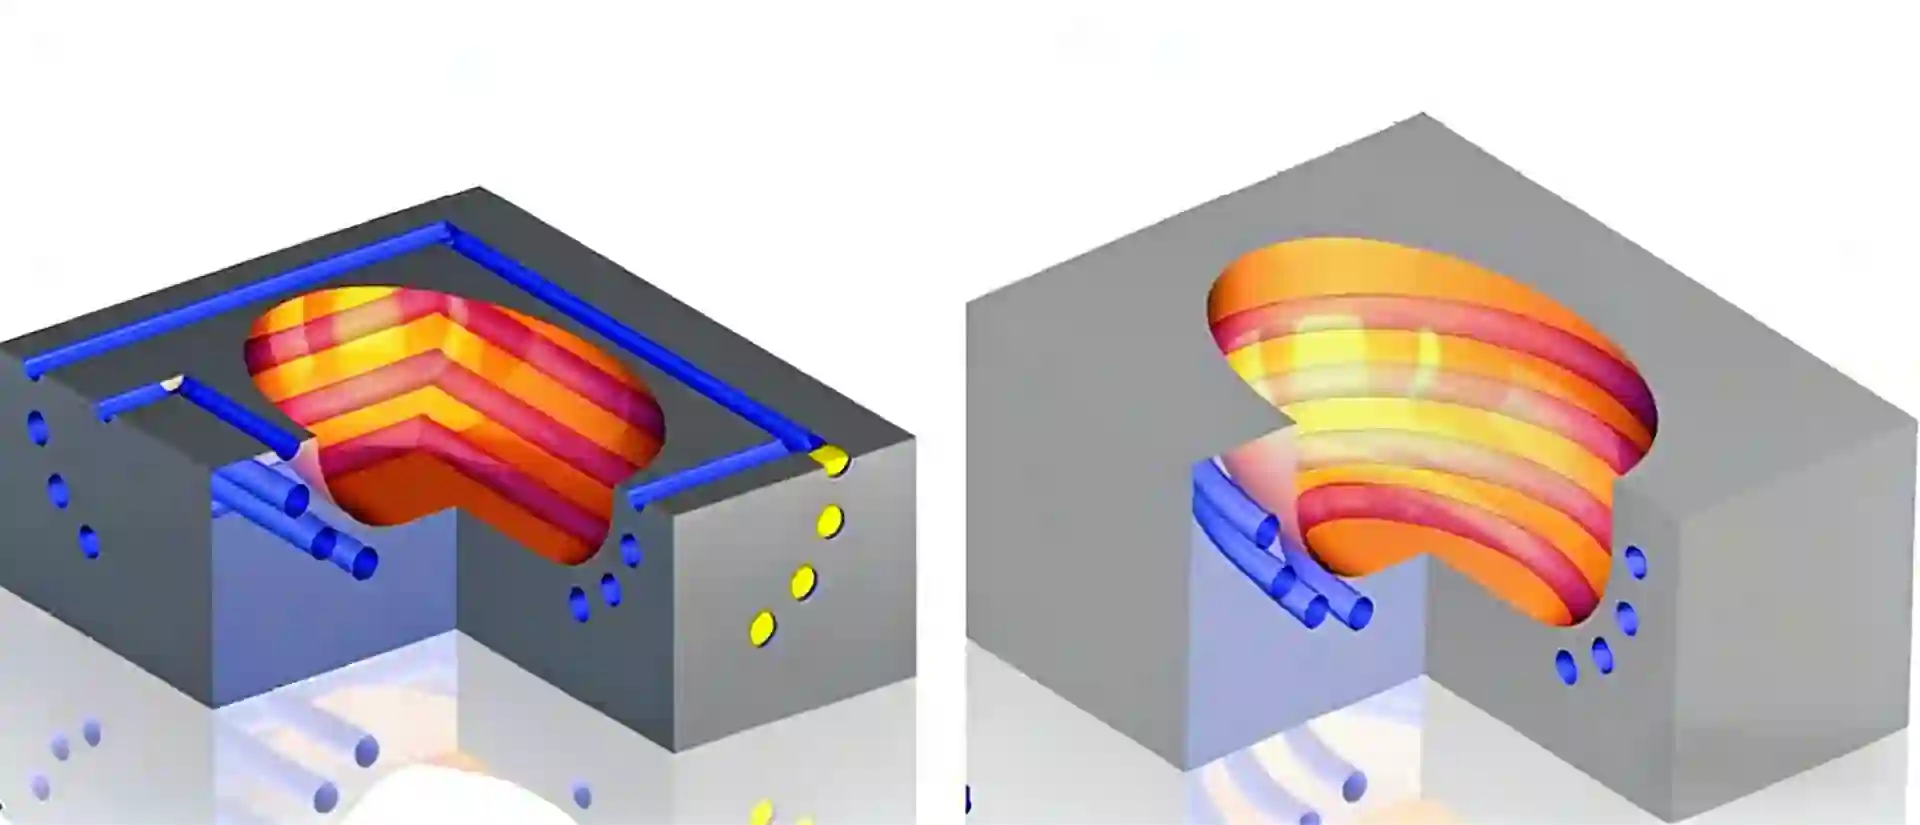
Cooling takes the most time in the molding cycle. Good cooling cuts cycle time and improves quality.
- Cooling channels: Placed close to the cavity surface.
- Baffles and bubblers: Used in areas that are hard to reach.
- Conformal cooling: Uses 3D-printed channels that follow the part shape. This is the best but most expensive option.
Ejection System Design
After the part cools, it must come out. Ejector pins push it out.
- Pin placement: Put pins on strong areas like ribs or bosses.
- Pin size: Use enough pins to spread the force.
- Ejector marks: Pins leave small marks. If marks are not allowed, use a stripper plate.
Common Mold Design Mistakes
Here are mistakes we see often:
| Mistake | Result | Fix |
|---|---|---|
| No draft angle | Parts stick, ejection problems | Add 1-2 degrees draft |
| Thick sections | Sink marks, long cycle time | Use ribs instead of thick walls |
| Sharp corners | Stress cracks | Add radii |
| Poor gate location | Weld lines, short shots | Move gate or use multiple gates |
| Not enough cooling | Warpage, slow cycles | Add more cooling channels |
| Weak ejector pins | Part damage | Use more pins or larger pins |
One client had a mold with no cooling near a thick boss. Cycle time was 90 seconds. After adding cooling, it dropped to 45 seconds. That’s a huge cost saving.
Design for Manufacturing (DFM) Checklist
Before you send your design for quoting, run through this checklist:
- All walls have draft (1-2 degrees minimum)
- Wall thickness is uniform (within 25% variation)
- Ribs are 50-60% of wall thickness
- Inside corners have radii (0.5x wall thickness or more)
- Gate location is chosen with fill pattern in mind
- Ejector pins are on strong surfaces
- Cooling channels are included (designer will add)
- Undercuts are handled with slides or lifters (if needed)
Request a DFM analysis for your part
How Miracles Manufacturing Can Help
At Miracles Manufacturing, we have designed thousands of molds. Our engineers work with you from the start. We give honest feedback on your design. We suggest changes that save money and improve quality.
What we offer:
- DFM review: We check your design before you cut steel.
- Mold design: We create detailed 3D mold designs.
- Mold flow analysis: We simulate how plastic fills the mold.
- Prototype molds: Sometimes, fast, low-cost molds for testing; Sometimes, safety room for formal injection mold.
- Production molds: High-quality molds for long runs.
Talk to Our Mold Design Engineers
Frequently Asked Questions
Q1: How much does an injection mold cost?
A: It depends on size, complexity, and cavity count. Simple molds start around $3,000. Complex production molds can be $50,000 or more.
Q2: How long does it take to make a mold?
A: Prototype molds take 3-5 weeks. Production molds take 6-10 weeks.
Q3: Can you modify an existing mold?
A: Yes, we do mold repairs and modifications. But it is often easier and cheaper to design it right the first time.
Q4: What software do you use for mold design?
A: We use industry-standard CAD software like UG NX, SolidWorks, and Creo. We accept STEP, IGES, and native files.
Q5: What is mold flow analysis?
A: It is a computer simulation that shows how plastic fills the mold. It helps find problems like weld lines or air traps before building the mold.
Q6: Do you make molds for all types of plastics?
A: Yes, we design molds for commodity plastics, engineering plastics, and high-performance materials. Each material has different shrinkage and flow, so we adjust the design.
Conclusion

Good mold design is the foundation of successful injection molding. By following the principles in this guide, you can avoid common problems and get better parts. Remember: draft, uniform walls, rounded corners, and proper gating are key.
If you have a project, let our team help. We bring decades of experience to every design. We catch problems early and suggest improvements. That means fewer surprises and faster time to market.