
Sink marks are one of the most common defects in injection molding. They appear as small depressions or dimples on the surface of a part, usually in thicker areas like ribs or bosses. These marks can ruin the appearance of a product and may also indicate internal voids that weaken the part. Understanding sink marks in injection molding is essential for anyone who designs or manufactures plastic parts. In this guide, we explain what causes sink marks, how to identify them, and the best ways to prevent them. Whether you are an engineer, a buyer, or a quality manager, these insights will help you avoid costly scrap and rework.
What Are Sink Marks?
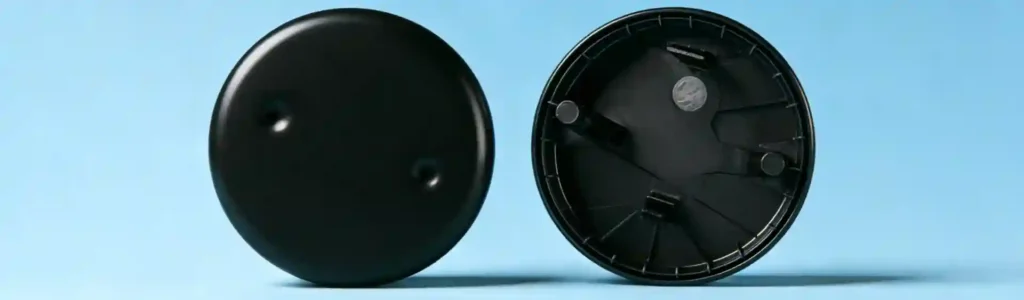
Sink marks are localized surface depressions that occur when the outer surface of a molded part cools and solidifies while the inner material is still molten and shrinking. As the inner material cools and pulls away, it drags the surface inward, creating a small dimple.
They are most common in areas with thicker cross‑sections, such as:
- Ribs that are too thick
- Bosses (especially around metal inserts)
- Thick walls where wall thickness is not uniform
Sink marks can range from barely visible to clearly noticeable. In severe cases, they may be accompanied by voids inside the part – empty spaces that reduce strength.
Primary Causes of Sink Marks
Thick Sections
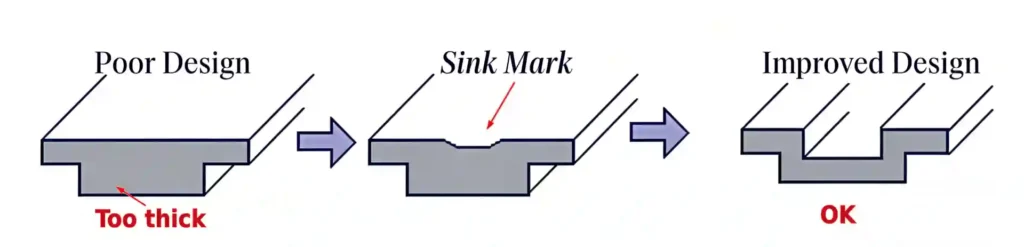
The main cause is geometry. When a wall thickness exceeds about 4–5 mm, the core stays hot longer than the skin. The skin solidifies first, and as the core cools and shrinks, it pulls the skin inward.
Insufficient Packing Pressure
After the cavity is filled, additional material is packed in to compensate for shrinkage. If the holding pressure is too low or too short, not enough material is packed in, and the part shrinks excessively.
Gate Freezes Too Early
If the gate freezes before the thicker sections have fully packed, no more material can enter. The thick area continues to shrink, pulling the surface inward.
Low Melt or Mold Temperature
Lower temperatures cause the material to freeze faster, reducing the time available for packing. This can leave thick sections under‑packed.
Material Shrinkage Rate
Different materials have different natural shrinkage rates. High‑shrinkage materials (like polypropylene) are more prone to sink marks than low‑shrinkage materials (like polycarbonate).
How to Identify Sink Marks
Sink marks are usually visible to the naked eye. In textured or painted parts, they may be hidden, but they can still be felt by running a fingernail across the surface. For critical surfaces, use a straightedge or a light source at a low angle to reveal slight depressions.
If you suspect internal voids, you can section a part or use X‑ray inspection. Voids are a more serious form of the same problem.
Solutions – Design Changes
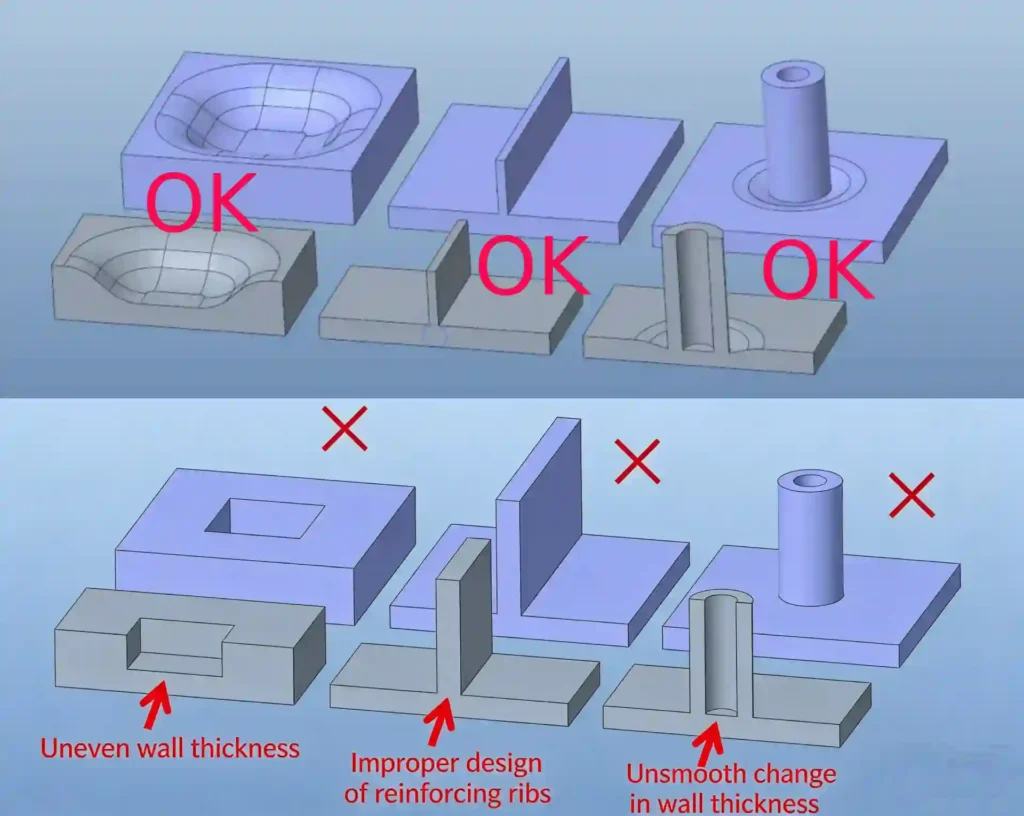
The best way to prevent sink marks is to design parts that avoid thick sections.
Keep Walls Uniform
Aim for wall thickness between 2 mm and 3 mm. If thicker sections are unavoidable, transition gradually from thin to thick.
Rib Design
Ribs should be 50–60% of the nominal wall thickness. A common rule: rib base thickness = 0.5 × wall thickness. If the rib is too thick, it will create a sink mark on the opposite surface.
Core Out Thick Sections
Where thick sections are needed (e.g., boss for a screw), core them out. Use a hole or a recess to reduce the actual wall thickness.
Add Radii at Rib Intersections
Sharp corners at the base of ribs increase stress and make sink marks worse. Use a radius (0.5–1.0 mm) to spread the load and improve material flow.
If you need help optimizing your part design to avoid sink marks, our engineers can review your 3D model and suggest improvements. We offer custom injection mold design services that include DFM analysis for defect prevention. This early review can save you from expensive mold modifications later.
Solutions – Process Adjustments
If the part design is fixed, process changes can often reduce or eliminate sink marks.
Increase Packing Pressure and Time
Higher holding pressure forces more material into the cavity, compensating for shrinkage. Extend the hold time until the gate freezes.
Reduce Melt Temperature
Lower melt temperature reduces shrinkage and allows faster cooling. But be careful – too low can cause short shots or poor surface finish.
Increase Mold Temperature
A warmer mold keeps the gate open longer, allowing more packing. It also slows cooling of the thick section, reducing stress.
Increase Injection Speed
Faster filling reduces heat loss and keeps the material flowing better, especially into thin ribs.
Relocate or Enlarge the Gate
Place the gate as close as possible to thick sections. A larger gate delays freezing, allowing more packing time.
Solutions – Material Selection
Some materials are naturally less prone to sink marks.
- Low‑shrinkage materials: PC, ABS, PPO have lower shrinkage and resist sinks better.
- Filled materials: Adding glass fibers or mineral fillers reduces shrinkage significantly.
- High‑flow grades: Materials with higher melt flow index fill cavities more easily, reducing the risk of sinks.
If you are stuck with a problematic design, switching to a glass‑filled grade can often solve the issue. But remember that fillers affect other properties like impact strength.
Common Myths About Sink Marks
| Myth | Reality |
|---|---|
| “Sink marks are only cosmetic.” | They often indicate internal voids that weaken the part. |
| “We can fix them by increasing cooling time.” | Cooling time helps, but packing pressure is more effective. |
| “All plastics sink the same.” | Shrinkage varies widely; choose material wisely. |
| “Sink marks mean the mold is bad.” | Usually it’s a design or process issue, not the mold. |
Case Example
A client came to us with a thick plastic handle that had visible sink marks on the gripping surface. The wall thickness was 6 mm – far too thick. We suggested coring out the handle with a honeycomb structure inside. The redesigned part had uniform 2.5 mm walls, and the sink marks disappeared. The part was also 30% lighter and saved material cost.
Summary Checklist
To prevent sink marks:
- Keep wall thickness uniform (2–3 mm typical)
- Rib thickness ≤ 0.6 × wall thickness
- Core out thick bosses
- Place gate near thick sections
- Use adequate packing pressure (80–100% of injection pressure)
- Choose a material with lower shrinkage if needed
For a deeper dive into all injection molding defects, read our injection molding defects guide.
Frequently Asked Questions
Q1: Can sink marks be polished out after molding?
A: No, sink marks are a surface depression, not a surface defect. They cannot be removed by polishing. The only fix is to correct the design or process.
Q2: Are sink marks always visible?
A: On textured or painted surfaces they may be hidden, but they still exist. In critical areas, they can become visible over time as the part wears.
Q3: What is the difference between a sink mark and a void?
A: A sink mark is a surface depression. A void is an empty space inside the part, often accompanied by a sink mark on the surface. Voids are more serious structurally.
Q4: How much packing pressure is enough?
A: Typically 50–80% of injection pressure. But it depends on the material and part geometry. Mold flow simulation can help determine the optimal pressure.
Q5: Can sink marks occur in thin walls?
A: Unlikely if walls are under 3 mm. But if there is a sudden change in thickness (e.g., a thin wall next to a thick boss), sink marks can appear on the thin side opposite the boss.
Q6: Does adding glass fiber always eliminate sink marks?
A: Glass fiber reduces shrinkage, but it doesn’t guarantee elimination. It also makes the material more abrasive and changes the surface finish.
Summary
Sink marks are a common but preventable defect in injection molding. By understanding their causes – thick sections, inadequate packing, early gate freeze – you can take steps to avoid them. Good design practices, proper process settings, and material selection all play a role.
At Miracles Manufacturing, we help clients design parts that mold perfectly the first time. Contact us to discuss your project.